An open source too for tracing Maya API calls made by any given application. Uses specialized version of Trace n Patch library customized to trace the Maya C++ API. Quite useful for Maya Plug-in developers and end-users alike to help optimize their scenes based on the internal evaluations of Maya runtime.
Currently offers the ability toThis should display a window listing the Maya API calls made by the target application. The File|Save option can be used to save the log entries. Note that the application is linked against MSVCR90 dlls. You should have the MSVCRT version 9 installed on your machine.
Looking for help with Maya API? Perhaps this open source application can help bring some insight into it. Download the Source code for a review.
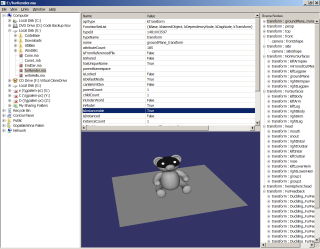
Maya File Viewer is a simple Win32 application built using WTL that lets you pick any Maya Ascii or Binary file and loads its content onto an OpenGL rendered surface.
The application uses a simple WTL based explorer style control to allow selecting a Maya scene file on the left hand side. Once the file is selected, a background thread will be spawned to intialize the Maya API library and load the scene content.
As you could have guessed, Universal Progress Dialog is used to display the progress of the loading. (If you havent already looked into it, Universal Progress Dialog is a handy Win32 library that lets you spawn a progress dialog box UI whenever you need to carryout a lenthy operation. Please refer to UPDialog.html for more details on it.)
Initializing Maya API is done with a call to MLibrary::initialize(). If you have not configured the MAYA_LOCATION environment variable correctly, then you might endup encountering an empty messagebox followed by a browse folder dialog during the call to that method. To avoid such problems, define the MAYA_LOCATION environment variable to point to the Maya installation directory (for e.g. C:\Program Files\Autodesk\Maya2008). The MLibrary::initialize function typically tries to load the dependent Dlls and resources from the sub-directory structure pointed to by MAYA_LOCATION.
Note that you might need to restart the Visual studio (or reboot the machine depending on your OS) to let the updated environment variable value reflect in the application.
Few other errors you might encounter while building with Maya SDK 2008 are:You will encounter this error if you are trying to build Maya SDK 2008 applications with Visual Studio 2008. You will not have this error if you have Visual Studio 2005 MFC libraries installed on the machine. This is because mfc80.lib is part of VS2005 and Maya SDK2008 libraires are linked with that version of VS and not with VS2008.
To avoid this error, use #define MLIBRARY_DONTUSE_MFC_MANIFEST before including the Maya header files.
#Including float.h inplace of values.h should resolve this error.
  TCHAR* pPath = pAppData->lpszFilePath;
  while(*pPath != _T('\0'))
  {
     if(*pPath == _T('\\'))
        *pPath = _T('/');
     pPath++;
  }
Upon successful loading, the application populates a tree control with Maya DAG nodes from the loaded scene.
MItDag offers a convenient way to iterate over the DAG nodes in any Maya scene, but not in a way that is useful for populating the visited nodes in a Windows tree control. This is because MItDag gives a linear list of nodes that make it a little bit difficult to get back the parent-child relation of the nodes. To be able to insert the nodes into a tree control we need the ability to recurse over the nodes efficiently, and MDagPath perfectly suits for this.
MDagPath offers methods to retrieve the children count, individual child by index, and to increase/decrease the path by pushing/popping any child node to/from the end of the path. The ability to push/pop a child node from the path is very useful for the recursion. We can use these methods to visit the entire graph rooted at the given path as shown below:
bool VisitDagPath(MDagPath& path, HWND hwndTree, HTREEITEM hTreeItem)
{
    TVINSERTSTRUCT tvi;
    tvi.hParent = hTreeItem;
    tvi.hInsertAfter = TVI_LAST;
    tvi.item.mask = TVIF_TEXT;

    // For each child
    for(unsigned int i=0, nMax = path.childCount(); i < nMax; ++i)
    {
        // Get the child object
        MObject& ChildObject = path.child(i);

        LPTSTR lpszName = _T("UnNamed");
        tvi.item.pszText = lpszName;

        // Insert a dummy node in the tree control to represent the child
        HTREEITEM hChildItem = TreeView_InsertItem(hwndTree, &tvi);

       // Now, lets visit the child object
        path.push(ChildObject);
        VisitDagPath(path, hwndTree, hChildItem);
        path.pop(1);
    }

    // Update the dummy tree node with real values of interest.
    if(path.node().hasFn(MFn::kDependencyNode))
    {
        MFnDependencyNode DepNode(path.node());
        TVITEM item;
        item.mask = TVIF_HANDLE | TVIF_TEXT;
        item.hItem = hTreeItem;
        item.pszText = (LPTSTR) MStringToTChar(DepNode.typeName());
        TreeView_SetItem(hwndTree, &item);
    }

    return true;
}
In the above code, we are visiting the nodes in depth-first manner starting from the given path. We first create a dummy tree item to make the recursion easier, and later come back to it (after visiting all the children) to update the item text with the required details (in the above example, we use type-name of the node as the tree item text).
Invoking the VisitDagPath() is quite easy. We retrieve the root node of the scene and pass its path, along with the root item of the tree control (which is typically NULL). We use the fact that a fresh MItDag variable initially points to the root node of the scene, and using on it retrieves the path of the root node. The code looks something like below:
{
    // We use MItDag to retreive the path to the root object of the scene
    MItDag dagIter;

    MDagPath path;

    if(!dagIter.getPath(path))
    {
        ErrorMessage(_T("Failed while retrieving the Root node Path"));
        return false;
    }

    // Start the DAG traversal
    VisitDagPath(path, hwndTree, NULL);
}
MStringToTChar is
a simple helper function to convert
MString to
LPCTSTR defined
as below:
inline LPCTSTR MStringToTChar(const MString& MStr)
{
#if defined(UNICODE) || defined(_UNICODE)
    return MStr.asWChar();
#else
    return MStr.asChar();
#endif
}
One way you can view the Maya scene in any OpenGL rendered application is to enumerate over the Meshes and render each of their polygons (as quads or triangles etc.). We can use the MItMeshPolygon class to iterate over the polygons of any given Maya mesh. This approach is particularly useful if you would like to build your own scene manager out of the Maya scene meshes or if you wish to optimize the mesh in any way. However, if you are not interested in this kind of post-processing, but just want to effectively visualize the scene content directly, then you can use the MGeometryManager for your advantage.
MGeometryManager has a static method, MGeometryManager::getGeometry() that accepts the DAG path of the shape we are interested in, and returns a MGeometry object. You can specify which details of the geometry you want to extract out of the given shape, such as vertices, normals etc., in the MGeometryRequirements parameter of the MGeometryManager::getGeometry(). Once you have the MGeometry object, you can query the raw geometry data out of it using the methods such as MGeometry::position(), MGeometry::normal() etc., which would return you the data in a MGeometryData object. The exact type of the data you get may vary, and can be decided using the methods MGeometryData::elementSize(), and MGeometryData::elementType(). These methods return values from an enumeration that decide if the resultant geometry data is a scalar value or 2-valued vector or 3-valued vector etc... and if the elements are float or integer etc... Please refer to the FileProc.cpp file in the attached source code for a sample usage of this mechanism.
Rendering to movie directly in Maya is not bad, but if you encounter any inconsistencies, such as codec quality problems or frame rate mismatch etc... correcting them is too costly, because you have to re-render the whole animation again. This could be costly if your scene is complex.
A better work-flow is to render the animation into images (preferably tiff format or tga format) and then use post-processing tools such as Combustion or AfterEffects to combine the generated images into an animation movie you like. This is the typical professional workflow and offers you more control over your final sequence. (For example, if you would like to overlay your animation on top of a static 2D background, then you can do that very easily with those post-processing tools. Please refer to any good "Multipass Rendering" source for more details on it.)
In case you are not much interested in the post-processing, or do not have access to those post-processing software, you can still use any good video editing tool to combine the generated images into a movie. The advantage is, you do not need to re-render the whole animation if you would like to, say just change the compression mode, or say change the frame-rate. You can simply use your image sequence and re-create the video with your new codec settings / frame-rate settings.
Vegas Pro, ULead Movie Studio etc... are few professional video editing software that let you create movies out of your image sequences. There are many free editing tools available too, such as Avid Free or Windows Movie Maker. Of course, if you would like to get creative, you can roll out your own custom animation creation application with my C++ movie creation library. The advantage with these tools is, we can concentrate on the "movie" part without being worried about the Maya rendering complexities. We can test create the video (from our Maya generated images) with one codec and see the size and quality, change the codec or framerate and re-create the video and check it again for quality and so on. This is especially useful, if you would like to target for multiple types of audience, such as if you are planning to distribute your video over web you can create one movie with low bit-rate and then you can create another hi-fi version with high bitrate for off-line play. All from one set of image sequence, without costing precious Maya rendering times.
The way you can generate image sequence from Maya is, by using the Render Settings. Follow the below steps:Once you have the Maya animation as an image sequence, you can import that image sequence into your post-processing tool, such as Combusion or AfterEffects, and apply the required effects, such as color correction or adding overlays. Or, you can import the image sequence into the video editing tool and use your favorite codec and frame rate settings to generate the movie, create it in multiple formats, based on the target audience type, and distribute it. All from just one rendering.
By
P.Gopalakrishna